How to Screen Record on a Chromebook: 5 Best Tools (2026)
ShareRec — best for instant share links that expire on their own — is the top pick for recording a Chromebook screen when you need to send a walkthrough to a client or teammate without uploading a file first. If you just need to record your screen right now, Chromebook's built-in tool works without installing anything: press Shift + Ctrl + Show windows, select Screen record, choose full or partial screen, then pick your audio source and start recording.
1. Press Shift + Ctrl + Show windows — the Screen Capture menu appears at the bottom of the screen. 2. Select Screen record from the menu options. 3. Choose Record full screen or Record partial screen — partial screen lets you drag a custom capture area. 4. Select an audio source — Device audio, Microphone, or Both. 5. Click the recording area to start — click the stop icon in the shelf, next to the clock, to end and save the recording.
This native method needs no account and no extension. Beyond it, ShareRec covers instant link sharing with automatic expiry, Screencastify covers classroom and extension-based recording, StreamYard covers webcam- and microphone-heavy presentations, and Loom covers async team video messaging.
Chromebook Screen Recording vs. Screenshot: Audio Options, Save Location, and Troubleshooting
Screen recording captures Chromebook activity as a video file with optional audio, while a screenshot captures one still image — both open from the same Shift + Ctrl + Show windows menu, one tap apart. The Screen Capture menu lets you switch between the two without a separate shortcut to remember.
| Audio Source | What It Captures | Best For |
|---|---|---|
| Device audio | System sound only (video, music, app audio) | Tutorials with no narration |
| Microphone | Your voice only, no system sound | Narrating over a silent screen |
| Both | System sound and voice in one file | Presentations that need live commentary |
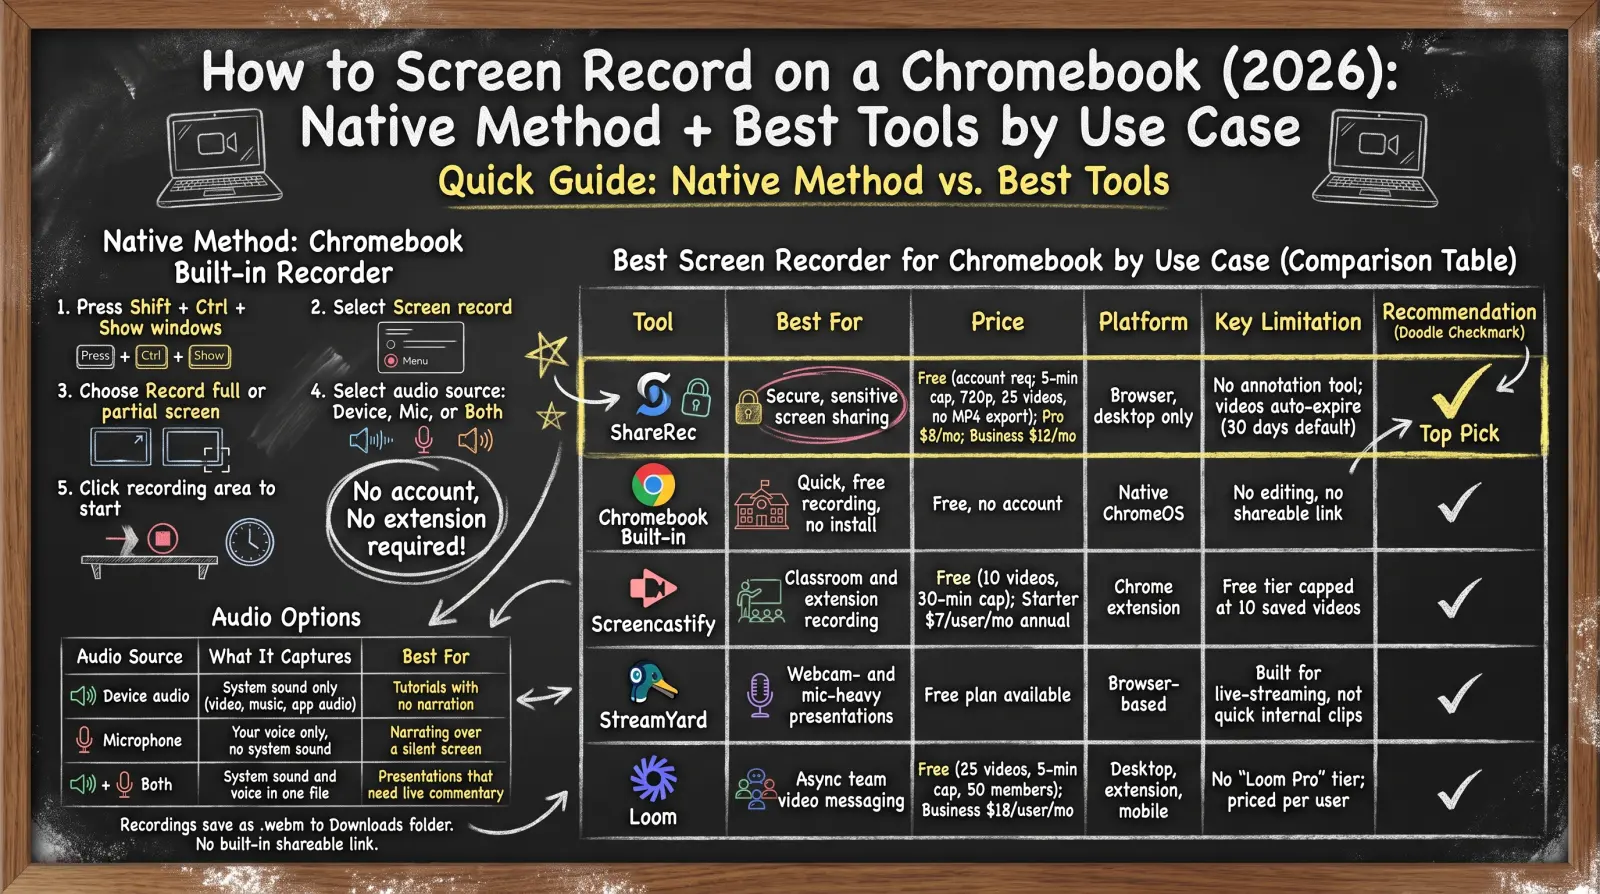
The same Screen Capture menu also carries a Front Camera toggle, which overlays the built-in webcam on top of the recording. Every Chromebook, Chromebox, and Chromebase uses the identical shortcut, because it's a ChromeOS-level feature rather than a hardware key combination. On convertible Chromebooks in tablet mode, the same Screen Capture menu opens from the quick settings panel instead of the keyboard shortcut.
Recordings save as .webm files directly to the Downloads folder, with a preview thumbnail appearing bottom-right the moment you stop. There's no built-in shareable link — the file has to be opened in the Files app and attached, uploaded, or shared manually.
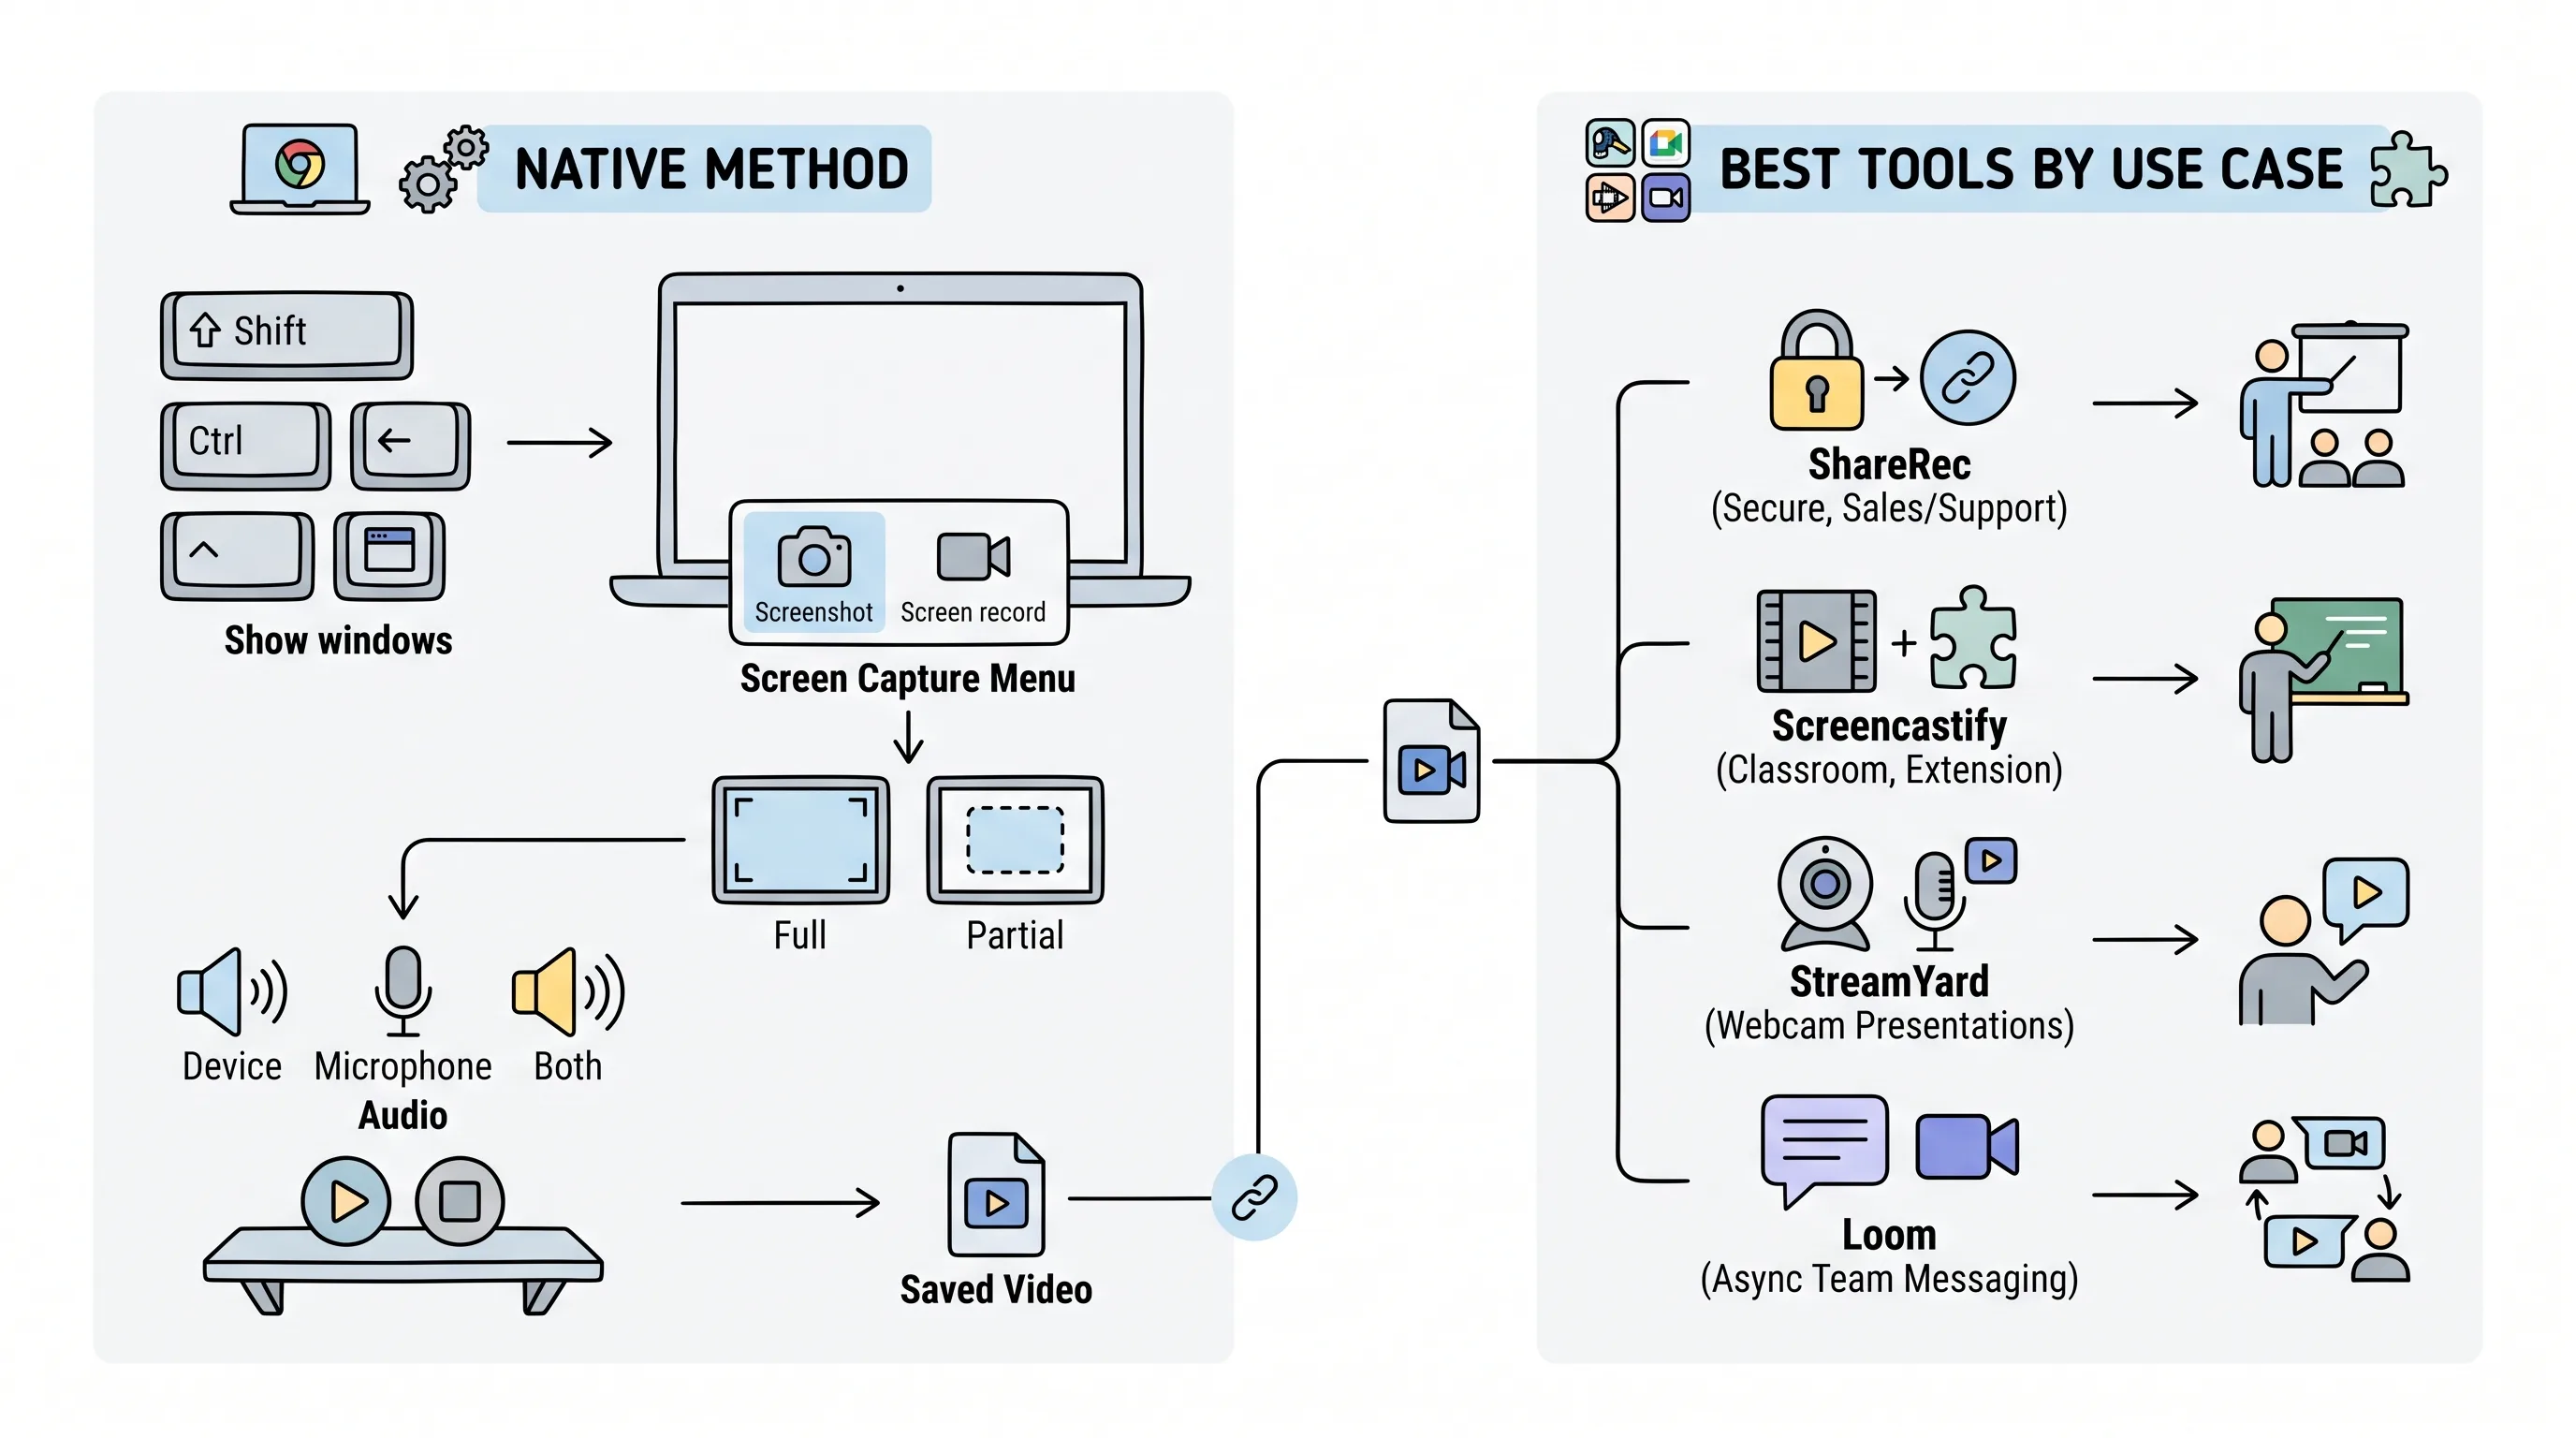
Best Screen Recorder for Chromebook by Use Case (Comparison Table)
ShareRec, Screencastify, StreamYard, and Loom each solve a different Chromebook screen-recording job, from instant link sharing to classroom capture to live presentations to async team updates. The table below compares price, platform, and the one limitation that matters most for each.
| Tool | Best For | Price | Platform | Key Limitation |
|---|---|---|---|---|
| ShareRec | Instant share links with auto-expiry | Free (account required; 5-min cap, 720p, 25 videos, no MP4 export); Pro $8/mo ($6/mo annual); Business $12/mo ($10/mo annual) | Browser, desktop only | Links are unlisted, not password-protected; no annotation tool |
| Chromebook Built-in Recorder | Quick, free recording, no install | Free, no account | Native ChromeOS | No editing, no shareable link |
| Screencastify | Classroom and extension recording | Free (10 videos, 30-min cap); Starter $7/user/mo annual | Chrome or Edge extension | Free tier capped at 10 saved videos |
| StreamYard | Webcam- and mic-heavy presentations | Free (2 hrs/mo local recording, SD, StreamYard logo); Core $44.99/mo ($35.99/mo annual); Advanced $88.99/mo ($68.99/mo annual) | Browser-based | Built for live-streaming, not quick internal clips |
| Loom | Async team video messaging | Free (25 videos, 5-min cap, 50 members); Business $18/user/mo | Desktop, extension, mobile | No "Loom Pro" tier; priced per user |
ShareRec: Best for Instant Share Links That Expire on Their Own
ShareRec's free tier costs nothing and Pro runs $8/month ($6/month billed annually) for unlimited 1080p recordings, with an instant, no-upload shareable link ready the moment you stop recording. Best for: sending a recording as a link instead of a file — sales demos, support walkthroughs, and client updates.
Every tier requires an account, and recordings expire 30 days after capture by default — owners can switch any video to Never, 24 hours, 7 days, or 30 days from a dashboard that shows a live countdown and sends a 3-day warning email before deletion. That control matters when a walkthrough is only relevant for a week. Note that share links are unlisted URLs rather than access-controlled ones: anyone holding the link can open the video, and ShareRec offers no link password, viewer sign-in, or per-viewer permissions — expiry is the privacy control, not an access control.
All three recording modes, the webcam bubble, and trim editing work on every plan including Free. Tiers differ on duration, resolution, retention and price — plus MP4 export, which is the one feature reserved for paid plans. Free caps out at 5 minutes, 720p, and the 25 most recent videos; Pro and Business unlock unlimited recordings, 1080p, and MP4 export.
ShareRec runs in a desktop browser only, with no mobile browser support, no AI transcripts or summaries, and no annotation tool on any tier. Pro's $8/month starting price is less than half the cost of Loom's Business plan ($18/user/mo).
Screencastify: Best for Chromebook Classroom and Extension-Based Recording
Screencastify installs as a Chrome or Edge extension — there is no desktop app — and caps its free plan at 10 saved videos and a 30-minute recording limit, with Starter plans starting at $7/user/month billed annually ($19/month billed monthly). Best for: classroom and Chrome-extension-based recording.
The extension model fits Chromebook-managed school and IT environments, where admins already push extensions through a central console instead of installing standalone apps. Pro runs $10/month billed annually ($25/month billed monthly) and raises the video and length limits.
That central-console deployment matters at scale: a school IT admin can push Screencastify to every managed Chromebook in a district through the Google Admin console in one action, rather than visiting each device individually, and the extension updates automatically the same way. For a teacher, that means the recorder is already installed and pinned to the toolbar on day one, with no setup instructions to distribute to students. The trade-off is that everything routes through Chrome's extension permissions model rather than a standalone app, so recording is tied to having the extension enabled in that browser profile.
Screencastify is a common third-party choice when the native recorder's lack of editing and hosted sharing gets in the way of a classroom workflow. Its extension-based install is the main reason teachers and IT admins reach for it over a separate desktop app.
StreamYard: Best for Webcam and Microphone-Heavy Presentations
StreamYard runs entirely in the browser and layers screen capture, webcam video, and microphone audio into one recording, on a free plan that allows two hours of local recording a month in standard definition and stamps a StreamYard logo on the result; paid plans start at Core $44.99/month ($35.99/month billed annually). Best for: webcam- and microphone-heavy presentations.
Setup takes four inputs: pick the screen or window to share, enable the webcam feed, select the microphone, then start recording. The webcam appears as an overlay on top of the shared screen, which suits product demos and webinars where the presenter's face matters as much as the content.
StreamYard is built around live-streaming and webinar workflows — multi-guest green rooms, on-screen banners, streaming destinations — rather than a quick record-and-send-the-link tool for internal reviews. That makes it heavier to set up than a single-purpose recorder when the only goal is a fast async clip.
That live-streaming heritage means StreamYard supports multiple guests in a shared browser room, on-screen name banners, and direct publishing to platforms like YouTube or LinkedIn — features a Chromebook user only needs when the recording is a live or semi-live broadcast rather than an internal walkthrough. For a Chromebook specifically, all of this runs in Chrome itself, so there's no extension or desktop install to manage, which fits ChromeOS's browser-first design.
Loom: Best for Async Team Video Messaging
Loom's free plan caps recordings at 25 videos and 5 minutes each for up to 50 workspace members, with Business starting at $18/user/month and Business+AI at $24/month. Best for: async team video messaging with AI features.
Loom's screen-recording quality and coverage across a desktop app, browser extension, and mobile app make it one of the more complete recording setups available. Transcripts and auto titles are free on every Loom plan; AI-generated summaries and chapters require the Business+AI plan at $24/user/month.
Those AI-generated summaries, on Business+AI, mean a teammate scanning a shared workspace can tell what a recording covers before pressing play, which matters when a team accumulates dozens of async updates a week. A Loom recording plays back the same on Windows, Mac, or a phone, with no separate viewer or format conversion required — the point of an async tool is that it works the same for whoever opens it, whenever they open it.
There's no "Loom Pro" tier anymore; Business is the entry-level paid plan. Loom's own device-compatibility page doesn't list ChromeOS as a supported platform — verify current support before standardizing a Chromebook fleet on it.
Key Takeaways
- ShareRec shares an instant, no-upload link the moment you stop recording, with flexible per-video expiry, from $8/mo.
- Chromebook's built-in recorder is free, pre-installed, and needs no account — Shift + Ctrl + Show windows starts it instantly.
- Screencastify caps its free tier at 10 videos and 30 minutes; Starter starts at $7/user/month billed annually.
- StreamYard is built for webcam- and microphone-heavy presenter recordings, not quick async clips.
- Loom caps its free plan at 25 videos and 5 minutes; Business starts at $18/user/month, with AI summaries on Business+AI.
Chromebook Screen Recording FAQ
How do I start screen recording on a Chromebook?
Press Shift + Ctrl + Show windows (the key with a rectangle icon, top row) to open the Screen Capture menu, select Screen record, choose full or partial screen, pick an audio source, then click the recording area to begin. No installation or account is required.
Can I record my Chromebook screen with audio?
Yes. In the Screen Capture menu, select an audio source before recording: Device audio captures system sound only, useful for tutorials that don't need narration; Microphone captures your voice only, for narrating over a silent screen; and Both records system sound and your voice together, for presentations that need live commentary.
What does Ctrl+Alt+Z do on a Chromebook?
Ctrl+Alt+Z toggles ChromeVox, ChromeOS's built-in screen reader — it has nothing to do with screen recording. If a Chromebook suddenly starts reading the screen aloud, that shortcut was likely pressed by accident. The actual recording shortcut is Shift + Ctrl + Show windows, the key with a rectangle icon in the top row, which opens the Screen Capture menu instead.
Is there a screen recorder in Chrome, or only on Chromebook?
ChromeOS's built-in recorder only works on Chromebooks, not the Chrome browser on Windows or Mac, because it's a ChromeOS system feature tied to the Shift + Ctrl + Show windows shortcut rather than a Chrome browser feature. Chrome browser users on other operating systems need a screen-recording extension such as Screencastify or Loom's browser extension instead.
How do I stop a Chromebook screen recording?
Click the stop icon in the shelf, bottom-right corner next to the clock, or press Search + Shift + X, to end the recording. ChromeOS saves the video as a .webm file directly to the Downloads folder, and a preview thumbnail appears bottom-right the moment you stop, confirming the recording saved successfully before you open the Files app to share it.
How do I screen record on a Chromebook without a Windows key?
Every Chromebook uses the same shortcut regardless of keyboard layout: Shift + Ctrl + Show windows, the key showing a rectangle with two lines, usually where F5 sits. Chromebooks don't have a Windows key by design, so you can screen record on a Chromebook without ever needing one.
Try it free
Record your first walkthrough free — no install needed
No install, no watermark — share a link instantly.
Start Recording Free